Renovation methods to improve bathroom comfort and safety
Outline:
- Why bathroom comfort and safety matter; principles of universal design
- Flooring and waterproofing strategies
- Lighting, ventilation, and electrical safeguards
- Plumbing, temperature control, and fixtures
- Conclusion: planning, budgeting, and maintenance roadmap
Introduction: Bathrooms see hard daily use, water, and steam—an unforgiving trio that exposes every design weakness. Safety is just as crucial as style here: falls remain a leading cause of injury at home, and wet surfaces heighten risk. Thoughtful renovation blends universal design, reliable materials, and code-aware choices so the space welcomes everyone, from kids with soapy hands to older adults seeking steady footing. The result is comfort that feels effortless and safety that quietly does its job in the background.
Plan the Layout with Universal Design in Mind
Start with a layout that treats comfort and safety as inseparable. Universal design emphasizes spaces that are easy to navigate, intuitive to use, and forgiving of limited mobility—permanent or temporary. Wider doorways (aim for a 36-inch door to achieve about 32 inches clear) accommodate walkers and mobility devices, while pocket or out-swing doors prevent blocking someone who may need help. Inside, a clear floor area—commonly 30 by 48 inches near sinks, showers, and toilets—supports safe transfers and easier maneuvering. Where possible, keep pathways straight, remove sharp turns, and provide a 60-inch turning circle or a T-shaped turning area so assistance devices can pivot without stress.
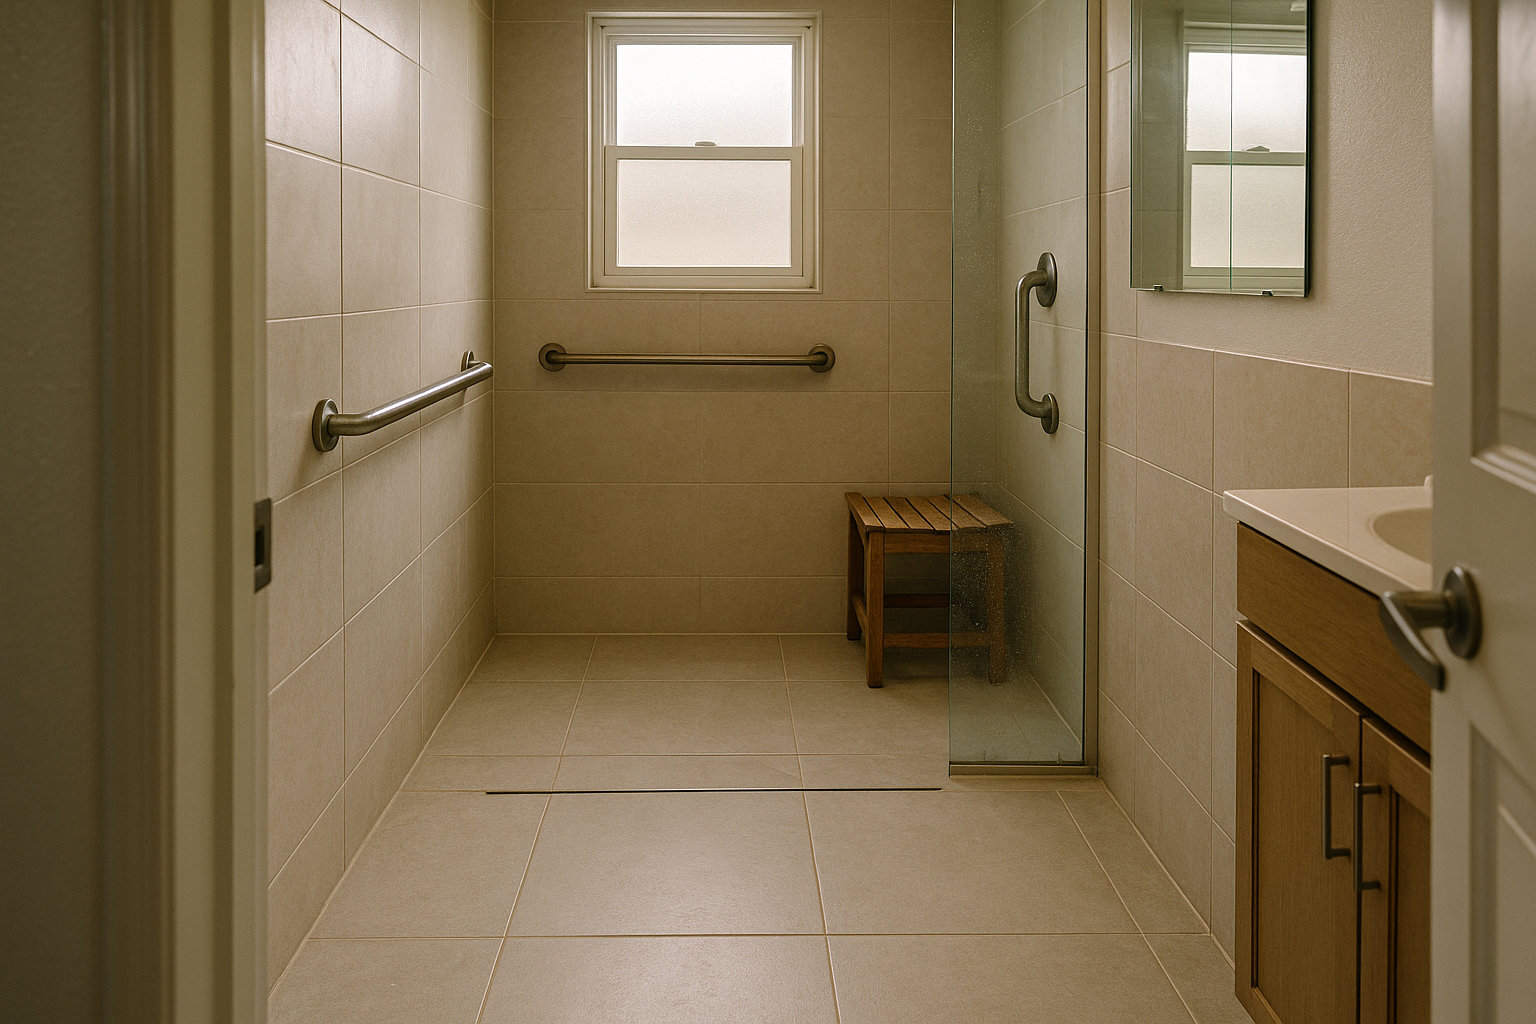
Within fixtures, choose simplicity and reach. Lever-style handles on faucets and doors are easier for small hands and arthritic grips alike. Wall-hung sinks and vanities provide knee clearance and allow seated use, while rounded countertop edges reduce bumps. A toilet height in the 17–19 inch range can ease sitting and standing, and a side transfer space improves accessibility. Consider a zero-threshold shower, which removes a tripping edge and creates a visual “flow” that’s as elegant as it is practical. A built-in or fold-down seat makes showering steadier, and locating controls near the entrance to the shower allows you to set temperature before stepping under the spray.
Grab bars are among the most effective safety upgrades, and planning for them early is savvy. Reinforce walls with blocking in shower and toilet zones so you can securely install bars later even if you’re not ready to add them now. Common guidance in the United States places horizontal bars 33–36 inches above the floor, but tailor placement to the primary user’s reach. Choose bars with a textured grip and return-to-wall ends that won’t catch clothing. You can blend practicality and style by aligning bar finishes with other hardware for a cohesive look.
Quick layout wins include:
- Keeping the shower entry at least 24 inches wide and ideally more
- Locating towel hooks and niches within easy reach of the shower seat or entry
- Avoiding door swings that conflict with users or fixtures
- Ensuring at least 18 inches from the toilet centerline to side walls for comfortable use
A well-planned layout reduces the tiny frictions that add up to fatigue or accidents. It also future-proofs the room, so a sprained ankle or aging parent is a logistics blip—not a crisis.
Tackle Slips and Leaks: Flooring, Drainage, and Waterproofing
Water and gravity are relentless; manage both with materials and details that resist slips and channel moisture away from vulnerable areas. Floor finish matters: aim for tiles with a wet dynamic coefficient of friction around 0.42 or higher per widely used standards for interior, level spaces. Matte or textured porcelain performs reliably, and small-format mosaics add grout lines that grip underfoot. If you prefer resilient flooring, look for products specifically rated for wet areas with embossed textures designed to disperse water. In any case, skip high-gloss finishes in the wet zone; they may sparkle, but they can behave like ice under soapy feet.
Slopes and drains are the quiet heroes of a safe bathroom. A shower pan typically needs about 1/4 inch per foot of slope toward the drain, and curbless showers benefit from linear or centered drains that quickly move water. Position the drain to minimize standing water, and consider a secondary drain if you have a larger, open plan. On the waterproofing front, use a continuous, compatible system: cement backer board or appropriate foam board with sealed seams; a waterproof membrane on shower walls and floors; and careful attention at niches, benches, and corners, where leaks tend to begin.
Grout and sealants deserve respect. Epoxy grout resists stains and moisture better than cementitious grout, though it takes more skill to install. Where you use cementitious grout, apply a quality penetrating sealer on a set schedule. In movement joints and at changes of plane (wall to floor, wall to curb), use a flexible sealant rather than grout to accommodate minor building shifts without cracking. A few practical checkpoints can save headaches:
- Flood-test the shower pan before tile goes in to confirm pitch and watertight seams
- Use backer rod and the correct sealant width-to-depth ratio so joints flex as designed
- Slope horizontal surfaces like window sills and bench tops into the shower to avoid pooling water
Finally, think beyond the wet zone. Place a small, discreet floor drain near a washing area or under a freestanding tub to catch overflows. Add splash protection behind freestanding tubs and near vanity edges with taller backsplashes. These low-profile moves keep moisture where it belongs, preserving subfloors and finishes and, more importantly, maintaining a firm, dry footing.
Light, Air, and Power: Seeing Clearly and Breathing Easy
Good lighting is comfort you feel without noticing. Combine layers: soft ambient light to fill the room, task lighting at the mirror for grooming, and a gentle accent to guide nighttime visits. For task areas, even, shadow-free illumination from both sides of the mirror is kinder to eyes than a single downlight that casts hard shadows. A color temperature around 2700–3000K creates a relaxing tone, while a high color rendering index (90+ if possible) helps with shaving and makeup. In shower zones, select wet-location rated fixtures; in some regions, an IP44 or higher rating is expected for direct water exposure.
Electrical safety underpins all the comfort in the world. Install ground-fault circuit-interrupter protection for receptacles near water sources, as required by most codes, and consider arc-fault protection where your local rules call for it. Keep switches outside direct splash paths, place outlets at a usable height (often 36–44 inches to center above the floor, adjusted for vanity height), and use tamper-resistant receptacles in family homes. Heated floors and towel warmers should be on dedicated circuits and controlled by listed, appropriately rated thermostats.
Ventilation is essential for safety and longevity. A properly sized exhaust fan limits condensation, stops mirror fog, and deters mold. A common benchmark is about 1 CFM per square foot of bathroom area, with many codes recognizing 50 CFM intermittent (or around 20–30 CFM continuous) as a minimum for a standard bath; larger rooms or enclosed showers often need more. Include a humidity or timer control so the fan runs long enough after showers to clear the air—20 to 30 minutes is typical. Keep duct runs short and straight, upsize to a smooth-walled duct where feasible, and include a backdraft damper at the exterior cap to prevent cold air and odors from drifting in.
Simple, high-impact moves include:
- Locating a dim low-level night light near the path to the toilet to reduce midnight missteps
- Selecting matte finishes on light trims to minimize glare
- Placing the fan pickup closer to the shower but away from direct spray for effective capture
- Sealing penetrations at lights and fans to prevent moist air from slipping into attic spaces
Clarity you can see and air you can’t smell are quiet signals a bathroom is doing its job. Together, they reduce eye strain, fogged tiles, and slippery condensate while keeping the structure dry and healthy.
Water, Heat, and Fixtures: Comfort without Compromise
Temperature control is central to safe comfort. Many safety agencies recommend setting water heaters to around 120°F (49°C) to curb scald risk while maintaining hygiene. Add point-of-use protection with a thermostatic mixing valve or pressure-balancing device in the shower so sudden pressure changes don’t spike temperature. Thermostatic valves hold a set temperature across fluctuations and often provide a maximum limit stop, while pressure-balance valves are simpler and protect primarily against sudden pressure drops. Either choice is a meaningful step toward safer bathing.
Fixture choices can add both ease and security. Handheld shower wands on an adjustable slide bar make rinsing simpler for seated users and reduce twisting. Pair them with a fixed head for flexibility. A built-in shower bench, sized around 15–16 inches deep and 17–19 inches high, supports steady transfers; slope the seat slightly toward the drain to avoid puddles. For sinks, consider single-lever or touch-control faucets that temper water before full flow. Wall-mounted faucets free counter space and reduce puddling around the base, and deeper sinks with rear drains help keep splashes contained.
Toilets deserve a comfort check. Seats 17–19 inches high typically ease standing and sitting, and elongated bowls improve aim and ergonomics. If space allows, maintain at least 18 inches from the bowl centerline to side walls, with more room feeling noticeably better. Adding a side grab bar or a floor-to-wall assist rail near the toilet can transform confidence for users who need a little leverage.
Protect the building as well as the bather. Insulate accessible hot-water lines to reduce heat loss and lower surface temperatures. Add shutoff valves that are easy to reach and label so a minor leak doesn’t become a drama. Consider discreet leak detectors and a shallow pan under appliances that share the room. Water-efficient fixtures—such as showerheads around 1.8 gpm and faucets near 1.2 gpm—reduce waste without sacrificing comfort when paired with good pressure and thoughtful spray patterns.
Small details multiply impact:
- Mount shower controls near the entry so you can set temperature before stepping in
- Use contrasting colors between floor and walls to help low-vision users perceive edges
- Choose rounded vanity pulls and soft-close hardware to reduce snags and pinches
- Add radiant floor heating with a floor sensor for warm toes and quick drying
Collectively, these choices tame temperature swings, calm the flow of water, and make every reach—whether to a faucet, a rail, or a towel—feel confident.
Bringing It All Together: Budget, Phasing, and Maintenance
A safe, comfortable bathroom is built as much on planning as on tile and fixtures. Begin with a clear scope: what must be improved now, and what can be stubbed in for the future? Blocking for grab bars, extra circuits for heat or lighting, and sloped subfloors for a potential curbless shower are easy to add during demolition and costly to retrofit later. Establish priorities—slip resistance, lighting, and scald protection usually rise to the top—then align them with your budget.
For planning, cluster work to minimize disruption. Replace flooring and complete waterproofing in one phase; then set fixtures; finally trim out lighting, ventilation, and accessories. If you’re living through the renovation, create a temporary bathing plan and stage essentials in lidded bins to keep dust at bay. When hiring trades, look for licensed pros experienced with wet-area detailing and local code compliance. Ask how they test shower pans, what waterproofing systems they use, and how they handle penetrations at niches and benches—precise answers here often signal careful execution.
Maintenance is the quiet guardian of safety. Set a simple schedule:
- Weekly: squeegee shower walls and floors to limit soap film and keep surfaces grippy
- Monthly: clean fan grilles, test GFCI outlets, inspect sealant joints for gaps
- Quarterly: reseal cementitious grout if required, check for slow leaks at valves and supplies
- Annually: vacuum ducts, verify fan performance, inspect caulked seams and replace as needed
Budget ranges vary by region and scope, but you can stretch dollars by investing where function meets risk. Slip-resistant flooring, robust waterproofing, and reliable ventilation often offer the strongest safety returns. Next come anti-scald controls, grab bars, and smart lighting. Aesthetic upgrades—mirrors, paint, decorative hardware—can follow without opening walls. If funds are tight, phase the project: complete structural and safety-critical work first, then layer comforts like radiant heat or upgraded cabinetry later.
Finally, remember who you’re building for. A bathroom that feels predictable, supportive, and easy to clean serves children racing for bedtime, guests unfamiliar with the layout, and older adults seeking steady ground. The changes are practical, but their effect is emotional: routine becomes restful, and the room becomes a partner in daily care, not a hazard to navigate. With a thoughtful plan and steady upkeep, the safest space in the house can also be the one you love most to use.